|   |
| |
To post an agency announcement, complete the following steps from the AWARDS Home screen:
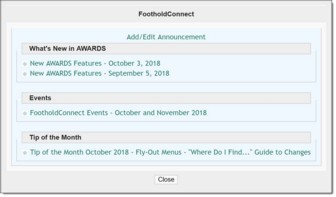
This pop-up contains an option to add/edit announcements, as well as a list of any active announcements posted by either your agency or Foothold Technology.
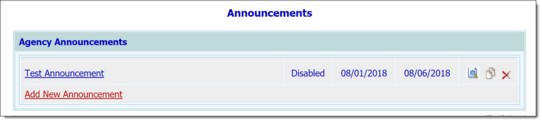
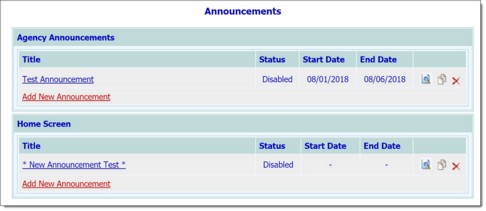
This page contains a list of any existing agency announcements, as well as the option to add a new one.
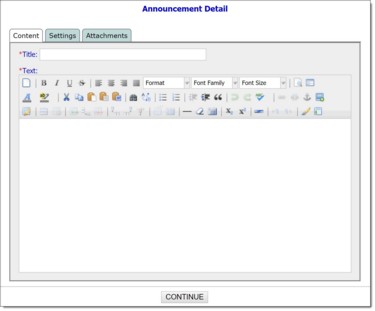
By default, the first of the three announcement detail tabs, "Content," is open on this page. It is used to identify the announcement and enter its content.
![]() TIP: For a brief description of what each formatting option does, hover your mouse over its icon in AWARDS.
TIP: For a brief description of what each formatting option does, hover your mouse over its icon in AWARDS.
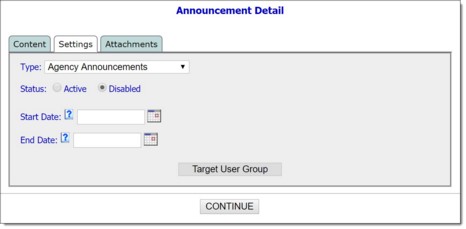
![]() Agency Announcement - When selected, the announcement is listed on the announcements pop-up displayed when FootholdConnect is clicked from the Home screen's left-hand menu.
Agency Announcement - When selected, the announcement is listed on the announcements pop-up displayed when FootholdConnect is clicked from the Home screen's left-hand menu.
![]() Home Screen - When selected, the announcement can be set to display as a link on the Home screen's left-hand menu, or as a pop-up message users see upon logging into AWARDS. If this type is selected, click the "Display Type" radio button (beneath the Status options referenced in step 8) that corresponds to your preferred announcement location - Side Link or Pop-up, respectively.
Home Screen - When selected, the announcement can be set to display as a link on the Home screen's left-hand menu, or as a pop-up message users see upon logging into AWARDS. If this type is selected, click the "Display Type" radio button (beneath the Status options referenced in step 8) that corresponds to your preferred announcement location - Side Link or Pop-up, respectively.
![]() Active - When selected the announcement is available for viewing as of the start date entered in step 9, or immediately if no start date is specified.
Active - When selected the announcement is available for viewing as of the start date entered in step 9, or immediately if no start date is specified.
![]() Disabled - When selected the announcement is NOT available for viewing, regardless of any start or end dates entered in steps 9 or 10.
Disabled - When selected the announcement is NOT available for viewing, regardless of any start or end dates entered in steps 9 or 10.
If this announcement is to be available for all staff, continue with step 13.
If the announcement's availability should be limited to staff members assigned to specific user groups, click Target User Group. The Target User Group List pop-up is displayed.
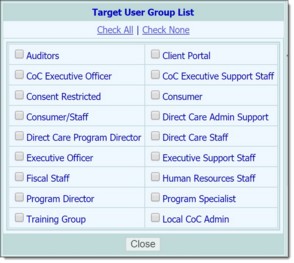
![]() NOTE: The user groups available for selection in this list are those configured for the database using the System Setup module, Permissions Maintenance, Configure User Groups feature. For more information see Configuring User Groups.
NOTE: The user groups available for selection in this list are those configured for the database using the System Setup module, Permissions Maintenance, Configure User Groups feature. For more information see Configuring User Groups.
To skip the process of attaching files to this announcement, continue with step 18.
To attach one or more files to this announcement, click the Attachments tab. The Announcement Details attachment selection page is displayed.
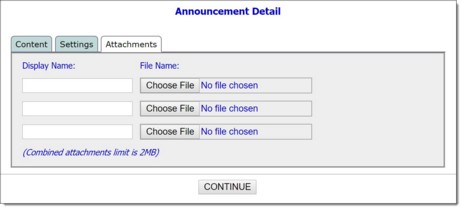
![]() NOTE: The total size of all files attached to the announcement cannot exceed 2MB.
NOTE: The total size of all files attached to the announcement cannot exceed 2MB.
![]() NOTE: The total number of all files attached cannot exceed four.
NOTE: The total number of all files attached cannot exceed four.
![]() NOTE: Accepted file types are .DOC, .XLS, .PDF, .JPG, and .BMP.
NOTE: Accepted file types are .DOC, .XLS, .PDF, .JPG, and .BMP.
![]() NOTE: Agency Announcements and Home Screen messages are displayed separately in this index.
NOTE: Agency Announcements and Home Screen messages are displayed separately in this index.
Additionally, if you indicated in step 8 that the announcement should be active immediately, it is added to the FootholdConnect pop-up menu at this time. Otherwise, it will become active as of the specified start date, or when the status is manually changed from "Disabled" to "Active."
![]() TIP: To preview your announcement now or at any time in the future, click the magnifying glass icon for that announcement in the index.
TIP: To preview your announcement now or at any time in the future, click the magnifying glass icon for that announcement in the index.
![]()
![]() TIP: To confirm that a new active announcement is now available, first refresh your Home screen by clicking your browser's Refresh button, or pressing <Ctrl+R>. Next, click FootholdConnect from the left-hand menu bar. Your announcement will be listed as an "Agency Announcement" in the pop-up menu.
TIP: To confirm that a new active announcement is now available, first refresh your Home screen by clicking your browser's Refresh button, or pressing <Ctrl+R>. Next, click FootholdConnect from the left-hand menu bar. Your announcement will be listed as an "Agency Announcement" in the pop-up menu.
The process of posting an announcement is now complete.
https://demodb.footholdtechnology.com/help/?10115
