|   |
| |
When working with an ExportBuilder, users have the ability to generate export file formats from scratch, which can then be saved for later use as needed. Alternately, export files can be generated from previously saved export formats, as well as from report formats saved when using the corresponding ReportBuilder. To generate an export file using any of these methods - each of which is described here - complete the following steps:
![]() TIP: The basic process of generating an export file is the same across all ExportBuilders; however, some steps may vary slightly based on the type of data being worked with and the ReportBuilder through which the ExportBuilder has been accessed. Such variations are noted within the instructions that follow.
TIP: The basic process of generating an export file is the same across all ExportBuilders; however, some steps may vary slightly based on the type of data being worked with and the ReportBuilder through which the ExportBuilder has been accessed. Such variations are noted within the instructions that follow.
![]() NOTE: The steps that follow use the Demographics ExportBuilder, accessed from the Reports module, as an example.
NOTE: The steps that follow use the Demographics ExportBuilder, accessed from the Reports module, as an example.
![]() TIP: The specific options you see are based on the ReportBuilder through which you have accessed this ExportBuilder; both utilize the same date range settings. As a result, it may be useful to review the instructions for the relevant ReportBuilder in Online Help if you have questions about the date range setting(s) available here.
TIP: The specific options you see are based on the ReportBuilder through which you have accessed this ExportBuilder; both utilize the same date range settings. As a result, it may be useful to review the instructions for the relevant ReportBuilder in Online Help if you have questions about the date range setting(s) available here.
![]() Clients with Records - The default. Includes in the export all clients with records matching the export settings. Any client WITHOUT records matching the export settings is excluded.
Clients with Records - The default. Includes in the export all clients with records matching the export settings. Any client WITHOUT records matching the export settings is excluded.
![]() All Clients - Includes in the export all clients on the program roster, whether or not they have records that match the export settings. Those without matches will display "--" for data variables in the export where no match exists.
All Clients - Includes in the export all clients on the program roster, whether or not they have records that match the export settings. Those without matches will display "--" for data variables in the export where no match exists.
![]() Select Client - Limits export contents to those records for a single client only. Use the corresponding drop-down (automatically displayed when "Select Client" is clicked) to choose the client for whom the export is to be generated. (This allows you to easily generate exports, including saved exports, for a single client without having to use the filter options later on in the export generation process.)
Select Client - Limits export contents to those records for a single client only. Use the corresponding drop-down (automatically displayed when "Select Client" is clicked) to choose the client for whom the export is to be generated. (This allows you to easily generate exports, including saved exports, for a single client without having to use the filter options later on in the export generation process.)
Leave this selection at its default value, or adjust by clicking one of the other radio buttons if needed.
The page is updated to reflect your choice, changing to Export Settings, and displaying relevant export format selection options at the bottom of the page.
![]() NOTE: When using this option the export file will remain in your messages for one month, after which time it will be deleted. (The exact date of deletion will be displayed in red at the top of the report message for your reference.) If you know you will need the export content after that time, be sure to download the file attached to the export message. If you don't download the attachment before the message is deleted, you will need to manually re-generate the export if you need access to it in the future.
NOTE: When using this option the export file will remain in your messages for one month, after which time it will be deleted. (The exact date of deletion will be displayed in red at the top of the report message for your reference.) If you know you will need the export content after that time, be sure to download the file attached to the export message. If you don't download the attachment before the message is deleted, you will need to manually re-generate the export if you need access to it in the future.
![]() Use a previously saved export format - To generate the export file using a format previously created and saved using this ExportBuilder, select the format from the first drop-down. (The page is updated to remove the second drop-down, which is not applicable in this case.) When using this method, you can immediately generate the export file without altering any settings. Alternately, you can first review and modify the settings of the format by checking off the available Provide option to modify settings of saved export format checkbox.
Use a previously saved export format - To generate the export file using a format previously created and saved using this ExportBuilder, select the format from the first drop-down. (The page is updated to remove the second drop-down, which is not applicable in this case.) When using this method, you can immediately generate the export file without altering any settings. Alternately, you can first review and modify the settings of the format by checking off the available Provide option to modify settings of saved export format checkbox.
![]() Use a previously saved ReportBuilder report format - To generate the export file based on a report format previously created and saved using the corresponding ReportBuilder, leave the first drop-down blank, and select the report format from the second drop-down. When using this method, data variable selections and content/order settings in the steps that follow will default from those used in the selected report, and can be adjusted as needed. Export file format and field mapping settings must be manually set.
Use a previously saved ReportBuilder report format - To generate the export file based on a report format previously created and saved using the corresponding ReportBuilder, leave the first drop-down blank, and select the report format from the second drop-down. When using this method, data variable selections and content/order settings in the steps that follow will default from those used in the selected report, and can be adjusted as needed. Export file format and field mapping settings must be manually set.
![]() TIP: Any changes made to the default settings of a report format in the steps that follow are only applicable to the export file being generated. To make changes to the report format itself that are then saved with that format, you must do so through the corresponding ReportBuilder.
TIP: Any changes made to the default settings of a report format in the steps that follow are only applicable to the export file being generated. To make changes to the report format itself that are then saved with that format, you must do so through the corresponding ReportBuilder.
![]() Start from scratch, without using a previously saved export or report format - To create your own export format for single-time use or for saving and later re-use, leave both drop-down options blank. When using this method, the steps that follow will include selection of data variables, and the setting of options for data content/order, file formatting, and field mapping.
Start from scratch, without using a previously saved export or report format - To create your own export format for single-time use or for saving and later re-use, leave both drop-down options blank. When using this method, the steps that follow will include selection of data variables, and the setting of options for data content/order, file formatting, and field mapping.
If you are using an existing export format and have NOT chosen to view/modify the settings of that format, you are now taken directly to the export file page. Continue with step 21.
In all other instances, the Options page is displayed. Continue with step 8.
![]() NOTE: When working with an existing report or export format the settings on this page default to those previously saved with that format.
NOTE: When working with an existing report or export format the settings on this page default to those previously saved with that format.
![]() Unduplicated Client Count - By default some export files will include all clients who were enrolled in the selected program(s) at some point during the date range specified in step 2. That may result in duplicate records in instances where a client has multiple histories in a single program, or a history in multiple programs.
Unduplicated Client Count - By default some export files will include all clients who were enrolled in the selected program(s) at some point during the date range specified in step 2. That may result in duplicate records in instances where a client has multiple histories in a single program, or a history in multiple programs.
When applicable to the current ExportBuilder, you will see an Unduplicated Client Count checkbox at the top of the page. Check off that option if you would like to filter out any duplicates, list any client only once in the export file, and limit file contents to the most recent data for each included client.
![]() TIP: This option is not available/relevant for all ExportBuilders, based on the type of data being worked with. If you do not see this checkbox, please disregard and continue on to choosing the fields to display.
TIP: This option is not available/relevant for all ExportBuilders, based on the type of data being worked with. If you do not see this checkbox, please disregard and continue on to choosing the fields to display.
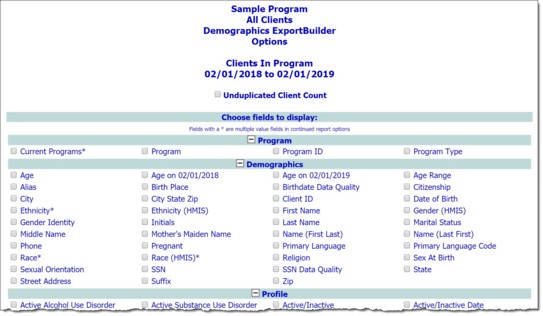
![]() Choose fields to display - The Settings page contains a list of data variables related to the ExportBuilder you are working with, representing data collected in various AWARDS locations. Click the checkbox next to each variable to be included in the export file, and/or use the available Check All option(s) as needed.
Choose fields to display - The Settings page contains a list of data variables related to the ExportBuilder you are working with, representing data collected in various AWARDS locations. Click the checkbox next to each variable to be included in the export file, and/or use the available Check All option(s) as needed.
![]() TIP: The specific data variables you see are based on the ReportBuilder through which you have accessed this ExportBuilder; both utilize the same options on this page. As a result, it may be useful to review the instructions for the relevant ReportBuilder if you have questions about the data variable selections.
TIP: The specific data variables you see are based on the ReportBuilder through which you have accessed this ExportBuilder; both utilize the same options on this page. As a result, it may be useful to review the instructions for the relevant ReportBuilder if you have questions about the data variable selections.
![]() NOTE: When working with an existing report or export format, the settings on this page default to those previously saved with that format.
NOTE: When working with an existing report or export format, the settings on this page default to those previously saved with that format.
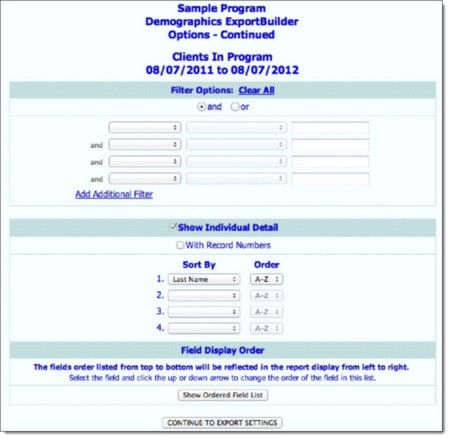
![]() Filter Options - Filters apply user-specified criteria to the export file variables chosen on the previous page, thereby limiting included records. To set a filter, click the drop-down arrow on the left in the first filter options row and select the variable to be used for filtering. Click the corresponding drop-down arrow and select the type of filter to be used. Lastly, in the corresponding field to the right of the filter selection, type the filter criteria. For example, these three columns could be set as "Gender," "Equals," and "Males" to limit file contents to only those records for male clients.
Filter Options - Filters apply user-specified criteria to the export file variables chosen on the previous page, thereby limiting included records. To set a filter, click the drop-down arrow on the left in the first filter options row and select the variable to be used for filtering. Click the corresponding drop-down arrow and select the type of filter to be used. Lastly, in the corresponding field to the right of the filter selection, type the filter criteria. For example, these three columns could be set as "Gender," "Equals," and "Males" to limit file contents to only those records for male clients.
Repeat as needed for a total of up to eight filters. (After adding four filters, click the Add Additional Filter link to add others.) If you have added multiple filters, be sure to click the and or or radio button to specify how those filters should be combined. The default is "and."
![]() TIP: It is not possible to combine "and" and "or" filters. As a result, the filter combination selection made here applies to all filters set for the export.
TIP: It is not possible to combine "and" and "or" filters. As a result, the filter combination selection made here applies to all filters set for the export.
![]() With Record Numbers - If the rows of data in the export file should be numbered, click this checkbox.
With Record Numbers - If the rows of data in the export file should be numbered, click this checkbox.
![]() Sort By / Order - To sort the export file by one or more of the included data variables, click the Sort By drop-down arrow(s) and select the variable(s). Click the corresponding Order drop-down arrow for each sorting selection to indicate whether the sort is to be ascending ("A-Z") or descending ("Z-A").
Sort By / Order - To sort the export file by one or more of the included data variables, click the Sort By drop-down arrow(s) and select the variable(s). Click the corresponding Order drop-down arrow for each sorting selection to indicate whether the sort is to be ascending ("A-Z") or descending ("Z-A").
Repeat as needed. Up to four sort by/order selections can be configured initially, after which additional selections can be added using the Add Additional Sorting link. Using that link you can add as many sort by/order selections as there are data variables chosen for inclusion in the ExportBuilder.
![]() Field Display Order - To adjust the order of the data columns in the export file, click a variable in the "Field Display Order" portion of the page to highlight it. Use the up and down arrow icons to the right of the variables list to move the highlighted variable up or down in the list, or drag and drop the variable to the desired position. Repeat as needed. The field display order listed from top to bottom here will be reflected in the export file columns display from left to right.
Field Display Order - To adjust the order of the data columns in the export file, click a variable in the "Field Display Order" portion of the page to highlight it. Use the up and down arrow icons to the right of the variables list to move the highlighted variable up or down in the list, or drag and drop the variable to the desired position. Repeat as needed. The field display order listed from top to bottom here will be reflected in the export file columns display from left to right.
![]() TIP: If more than eight data variables were selected on the previous page, the variables list is not automatically displayed. You must first click Show Ordered Field List before setting the order.
TIP: If more than eight data variables were selected on the previous page, the variables list is not automatically displayed. You must first click Show Ordered Field List before setting the order.
To hide a field from the export contents entirely, move it beneath the available "Hidden Fields" row. By doing so you can still filter your export contents on that variable, but keep its individual detail from being a part of the export if it is not necessary to include it.
![]() NOTE: When working with an existing export format, the settings on this page default to those saved with that format.
NOTE: When working with an existing export format, the settings on this page default to those saved with that format.
|
CSV |
TXT |
XLS |
XML |
The page is updated based on your selection.
|
Header Row |
Fixed Width / Delimited By |
Fields Qualified By |
|
Text Padding |
Numeric Padding |
Root Node |
|
Container Node |
Boolean Values |
Date Format / Separator |
|
List Delimiter |
Phone Format |
Value Mapping |
Configure or make changes to the settings of the applicable options as needed.
![]() NOTE: When working with an existing export format, the settings on this page default to those saved with that format.
NOTE: When working with an existing export format, the settings on this page default to those saved with that format.
![]() TIP: Data fields listed from top to bottom of this page represent export file fields/columns as they will be included from left to right.
TIP: Data fields listed from top to bottom of this page represent export file fields/columns as they will be included from left to right.
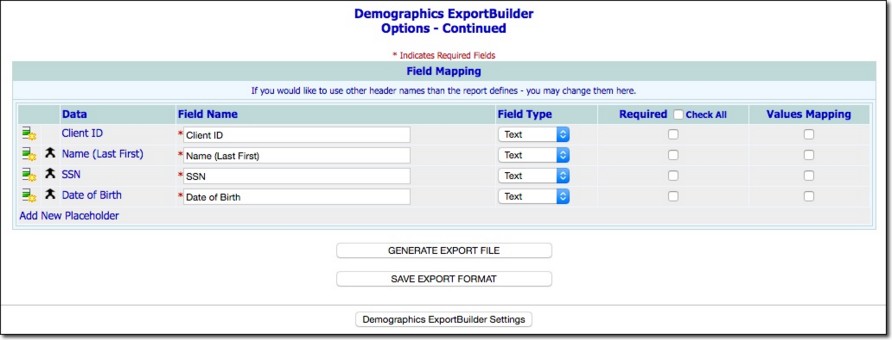
![]() TIP: "Sub-exports" allow for the embedding of saved export formats from other ExportBuilders. Those export formats link data for each client from the corresponding ExportBuilders to the Demographics ExportBuilder.
TIP: "Sub-exports" allow for the embedding of saved export formats from other ExportBuilders. Those export formats link data for each client from the corresponding ExportBuilders to the Demographics ExportBuilder.
![]()
![]() Add New Field - Click this icon to add a new field to export file to the left of the one in which the icon is clicked. A Select Field Type dialog box is displayed. Click the available drop-down arrow and choose the type of field being added:
Add New Field - Click this icon to add a new field to export file to the left of the one in which the icon is clicked. A Select Field Type dialog box is displayed. Click the available drop-down arrow and choose the type of field being added:
![]() Data Field - Adds an existing AWARDS field to the export.
Data Field - Adds an existing AWARDS field to the export.
![]() Placeholder Field - Adds a new field that is not currently available in the export file.
Placeholder Field - Adds a new field that is not currently available in the export file.
Click Ok to confirm your selection and display the updated settings page. In the Data column for the newly added field, either select the field name (if you have added a data field), or enter a name for the field (if you have added a placeholder).
![]() TIP: If you are working in the Demographics ExportBuilder and the new field is to contain a sub-export from another AWARDS module, be sure to select "Export Format" as the field type in step 15. You will then be able to select the sub-export's module and format name from the Data column rather than typing something in.
TIP: If you are working in the Demographics ExportBuilder and the new field is to contain a sub-export from another AWARDS module, be sure to select "Export Format" as the field type in step 15. You will then be able to select the sub-export's module and format name from the Data column rather than typing something in.
![]()
![]() Combine Field - Click this icon to combine the field with the row above it.
Combine Field - Click this icon to combine the field with the row above it.
![]() TIP: This option is useful for generating specific-use fields that an entity like a funder might ask for. For example, one of the many ways in which this feature can be used is in an instance where a funder requires a field to start with leading characters. In such cases you could use the Add New icon to add in a placeholder for those characters, and then combine it, using the combine option, with the field with which those characters should be associated.
TIP: This option is useful for generating specific-use fields that an entity like a funder might ask for. For example, one of the many ways in which this feature can be used is in an instance where a funder requires a field to start with leading characters. In such cases you could use the Add New icon to add in a placeholder for those characters, and then combine it, using the combine option, with the field with which those characters should be associated.
![]()
![]() Split Fields - Click this icon to split previously combined fields back into their original component parts.
Split Fields - Click this icon to split previously combined fields back into their original component parts.
![]() TIP: When non-placeholder fields, or field combinations without placeholders in them, are broken apart, the labels for the component fields return to their original values.
TIP: When non-placeholder fields, or field combinations without placeholders in them, are broken apart, the labels for the component fields return to their original values.
![]()
![]() Delete Field - Click this icon to remove a placeholder field.
Delete Field - Click this icon to remove a placeholder field.
![]() TIP: In order to delete a placeholder field which has been combined with another field, you must first split those two fields into their components using the Split option detailed above.
TIP: In order to delete a placeholder field which has been combined with another field, you must first split those two fields into their components using the Split option detailed above.
![]() Field Name - To use a field name other than the one specified on this page, overwrite the existing field name. This change applies to the export file only, and is not reflected elsewhere in AWARDS.
Field Name - To use a field name other than the one specified on this page, overwrite the existing field name. This change applies to the export file only, and is not reflected elsewhere in AWARDS.
![]() Field Width (Start - Finish) - In this box, type the column width this field should occupy in the export file. The start and finish positions are automatically determined based on the specified width for this field and any previous fields.
Field Width (Start - Finish) - In this box, type the column width this field should occupy in the export file. The start and finish positions are automatically determined based on the specified width for this field and any previous fields.
![]() NOTE: This option is only available for the TXT export type, when "Fixed Width" was selected on the previous page.
NOTE: This option is only available for the TXT export type, when "Fixed Width" was selected on the previous page.
![]() Field Type - Click this drop-down arrow and change the field type if needed. Available options are "Text," "Numeric," "Date," "Time." "Date/Time," "Yes/No," "List," and "Phone."
Field Type - Click this drop-down arrow and change the field type if needed. Available options are "Text," "Numeric," "Date," "Time." "Date/Time," "Yes/No," "List," and "Phone."
![]() NOTE: The field type specified here is used in conjunction with the padding options specified on the previous page, to ensure that the export file data is formatted appropriately.
NOTE: The field type specified here is used in conjunction with the padding options specified on the previous page, to ensure that the export file data is formatted appropriately.
![]() TIP: "Export Format" is only available when working in the Demographics ExportBuilder if the system finds a saved export format of the same export type in one of the following locations:
TIP: "Export Format" is only available when working in the Demographics ExportBuilder if the system finds a saved export format of the same export type in one of the following locations:
- Hospital > Episodes
- Medical > Allergies
- Medical > Medications
- Employment > Job Placements
- Employment > Job Interviews
If "Export Format" is selected here, the Data column for this variable will include two drop-down options. Use those options to select the module and export format to be used as a sub-export. When the export file is generated, data from the sub-export will be included.
![]() Tag or Property - Click this drop-down arrow and make a selection to indicate whether the export variable is a "Tag," "Sub-Tag," or "Property." The default value is "Tag."
Tag or Property - Click this drop-down arrow and make a selection to indicate whether the export variable is a "Tag," "Sub-Tag," or "Property." The default value is "Tag."
![]() NOTE: This option is only available for the XML export type.
NOTE: This option is only available for the XML export type.
![]() TIP: A property applies to the closest tag or sub-tag that precedes it, or to the container node when working with the variable at the top of the list. (An exception is made if the first variable is a sub-export, in which case the sub-export, as well as the very next field, will be treated as a tag, regardless of what is selected from this drop-down.)
TIP: A property applies to the closest tag or sub-tag that precedes it, or to the container node when working with the variable at the top of the list. (An exception is made if the first variable is a sub-export, in which case the sub-export, as well as the very next field, will be treated as a tag, regardless of what is selected from this drop-down.)
![]() TIP: A sub-tag will be indented under the closest tag that precedes it. The tag will be closed before the next field identified as a tag, or at the end of the file if there are no more tags that follow.
TIP: A sub-tag will be indented under the closest tag that precedes it. The tag will be closed before the next field identified as a tag, or at the end of the file if there are no more tags that follow.
![]() Required - If data is to be required in this field, click the corresponding checkbox (or use the Check All option at the top of the page to require all fields in the file). If any required fields do not have values in them when the export file is generated, those fields will be flagged in an error file.
Required - If data is to be required in this field, click the corresponding checkbox (or use the Check All option at the top of the page to require all fields in the file). If any required fields do not have values in them when the export file is generated, those fields will be flagged in an error file.
![]() Values Mapping - If any field values should be mapped to a different value during the export process, click the corresponding checkbox. Three sets of Criteria, From Value, and To Value fields are displayed.
Values Mapping - If any field values should be mapped to a different value during the export process, click the corresponding checkbox. Three sets of Criteria, From Value, and To Value fields are displayed.
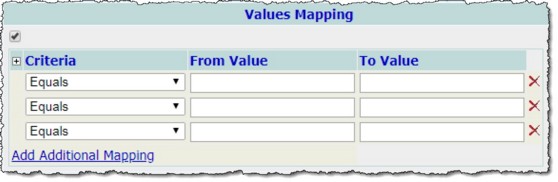
Available Criteria selections are "Equals," "Not Equal to," "Greater than," "Greater than or Equal to," "Less than," "Less than or Equal to," "Contains," "Does not Contain," "Is Blank," "Is not Blank," and "Between." The default value is "Equals."
Any entry in the From Value field will appear as its corresponding To Value entry.
At least one Criteria/From/To set must be entered if the Values Mapping option is selected. If more Criteria/From/To sets are needed, click the Add Additional Mapping link. To delete a mapping value set, click the red Delete icon to the right of the row to be removed from the Values Mapping table.
The Value Mapping field on the second Options page, displaying "Values not specified should remain as is:" and a checkbox is related to this functionality. If this is left unchecked, any values not listed will appear blank in the export file and on the screen display. If it is checked, they will remain as they appear in the ReportBuilder.
![]() TIP: If it is not necessary to save the export format and you only want to generate the export file, skip to step 22. Please keep in mind before doing so that if you choose to generate the export file without first saving, you may lose new fields added to the export if you later jump back to save the format. If you need to retain the full export format, always save here during step 17.
TIP: If it is not necessary to save the export format and you only want to generate the export file, skip to step 22. Please keep in mind before doing so that if you choose to generate the export file without first saving, you may lose new fields added to the export if you later jump back to save the format. If you need to retain the full export format, always save here during step 17.
![]() NOTE: When working with a previously saved export format, please keep in mind that only the user who originally saved a format and individuals who can save formats for all users can modify that format. Others can save modified formats under a new name, but cannot apply the modifications to the original format.
NOTE: When working with a previously saved export format, please keep in mind that only the user who originally saved a format and individuals who can save formats for all users can modify that format. Others can save modified formats under a new name, but cannot apply the modifications to the original format.
![]() TIP: We recommend that the title used be indicative of the export contents so that it is easily identifiable when selecting the format for the purposes of generating the export file in the future.
TIP: We recommend that the title used be indicative of the export contents so that it is easily identifiable when selecting the format for the purposes of generating the export file in the future.
![]() TIP: At present any descriptions entered using this new field will be for reference purposes in the individual ExportBuilder only; however, in the future this data will be a valuable component of the highly anticipated Saved Report Format ReportBuilder to be made available in a future product release.
TIP: At present any descriptions entered using this new field will be for reference purposes in the individual ExportBuilder only; however, in the future this data will be a valuable component of the highly anticipated Saved Report Format ReportBuilder to be made available in a future product release.
![]() Yourself - When selected, only the user saving the export format has the ability to use or modify that format.
Yourself - When selected, only the user saving the export format has the ability to use or modify that format.
![]() All Staff - When selected, all staff in the selected program(s) have the ability to use the export format; however, only you and other individuals with the ability to save export formats for all staff will be able to modify or delete that format.
All Staff - When selected, all staff in the selected program(s) have the ability to use the export format; however, only you and other individuals with the ability to save export formats for all staff will be able to modify or delete that format.
![]() NOTE: Users with the Save ReportBuilder Formats For All Staff permission (assigned under System Setup > Permissions Maintenance) have the ability to save export formats to be used by others. Users without this permission can only save export formats for themselves.
NOTE: Users with the Save ReportBuilder Formats For All Staff permission (assigned under System Setup > Permissions Maintenance) have the ability to save export formats to be used by others. Users without this permission can only save export formats for themselves.
![]() NOTE: If you chose the "Send in AWARDS Message" option on the initial export option settings page, a notice will be displayed upon clicking GENERATE EXPORT FILE to let you know that the export file will be sent to your Messages module upon completion. You can then navigate away from the page, or wait for the export to complete and then proceed with step 23.
NOTE: If you chose the "Send in AWARDS Message" option on the initial export option settings page, a notice will be displayed upon clicking GENERATE EXPORT FILE to let you know that the export file will be sent to your Messages module upon completion. You can then navigate away from the page, or wait for the export to complete and then proceed with step 23.
![]() Review the export contents - A report version of the export file contents is displayed on the ExportBuilder page. The data in that report can be sorted and worked with on the page as needed, though keep in mind that any changes made here are not applied to the export file itself.
Review the export contents - A report version of the export file contents is displayed on the ExportBuilder page. The data in that report can be sorted and worked with on the page as needed, though keep in mind that any changes made here are not applied to the export file itself.
![]() View the error log - If any errors were found when the export file was generated, and have been included in the export file, an error log link is available. Use that log to review the errors (for example, a required field that does not contain data) and go back into the relevant records in AWARDS to make corrections as needed. Once corrections have been made the export file must be re-generated.
View the error log - If any errors were found when the export file was generated, and have been included in the export file, an error log link is available. Use that log to review the errors (for example, a required field that does not contain data) and go back into the relevant records in AWARDS to make corrections as needed. Once corrections have been made the export file must be re-generated.
![]() TIP: Error log files are in .TXT format and can be viewed and worked with from within any text editor; for example, Notepad.
TIP: Error log files are in .TXT format and can be viewed and worked with from within any text editor; for example, Notepad.
![]() Download the export file - To do so click the Download File link and follow the prompts on the subsequent dialog boxes to save that file to your computer. Included among these prompts is a PHI Download Alert, reminding you of your obligation to properly handle any confidential data and/or protected health information (PHI) within the export file in accordance with related government regulations and agency policies. After reading the alert, click OK to acknowledge it and proceed with the download, or Cancel to return to the previous page.
Download the export file - To do so click the Download File link and follow the prompts on the subsequent dialog boxes to save that file to your computer. Included among these prompts is a PHI Download Alert, reminding you of your obligation to properly handle any confidential data and/or protected health information (PHI) within the export file in accordance with related government regulations and agency policies. After reading the alert, click OK to acknowledge it and proceed with the download, or Cancel to return to the previous page.
The process of generating an export file is now complete.
https://demodb.footholdtechnology.com/help/?11727
